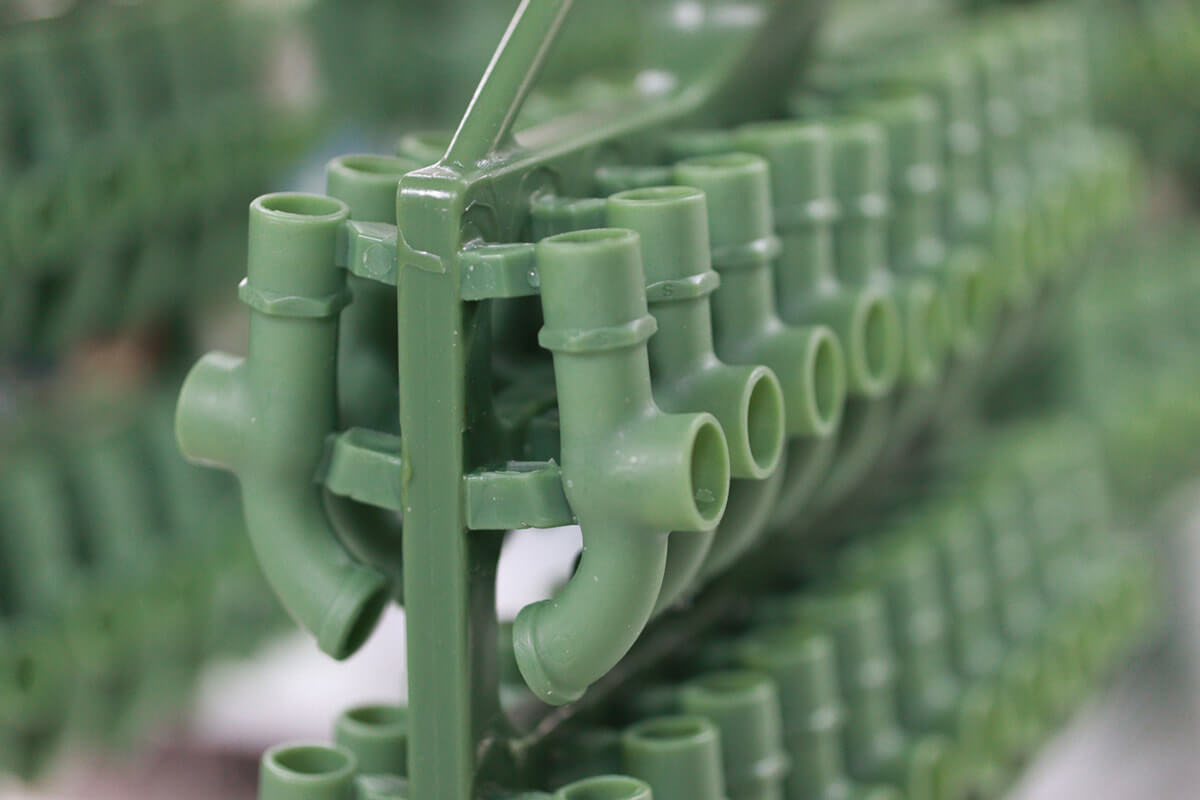
Making a mold to make wax molds is the first step in lost wax casting.
There is a Chinese word “Mo Fan” derived from the bronze ware production in ancient times. At the beginning, every time a bronze ware was made, clay was used as a “Mo”( like the wax molds today) first, and then it was turned over to form a “Fan”(like the sand moulds today). Then melt alloys such as copper and tin in proportion, pour the liquid metal alloy into the cavity and wait for it to cool down. After being removed from the “Fan”, it is cleaned and polished to become a bronze utensil. In this kind of production, one mold can only be turned into one model, and one mould can only cast one product. If a “Fan” is obtained, the “Mo” must be broken, and if it is finished, the “Fan” must be destroyed. Therefore, the ancient bronzes were made with different “molds”, and they are different from each other. Later, with the development of casting technology, casters no longer use clay as a mode. Instead, they use material such as stone, copper, lead, and iron that can be cast many times to make molds, so the casting objects become exactly the same. For the ancient Chinese have to make “Mo” and “Fan” in the casting processes. “Mo Fan”(Molds) are like the mother of casting products. The more precise the molds are, the more beautiful the casting products are casted. Therefore, the Chinese phrase “Mofan” was later extended as a code of conduct or a model for adopting the law, and it is still used today.
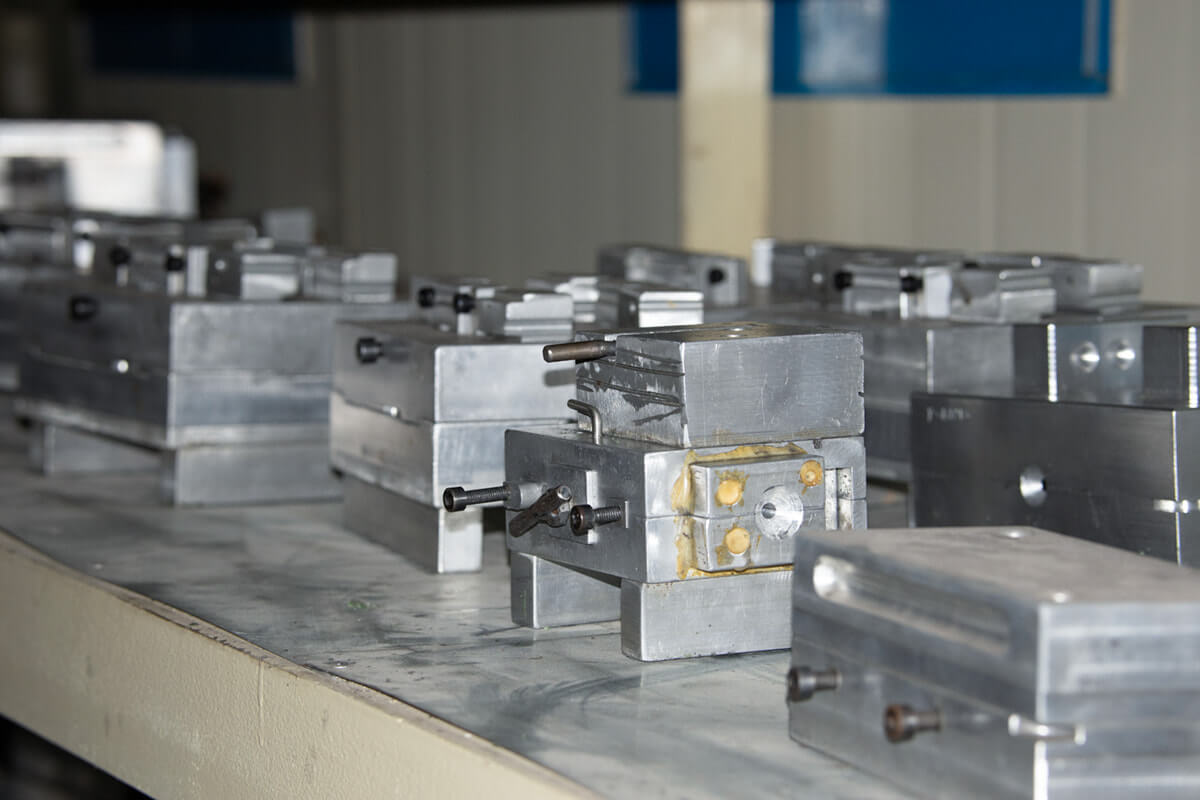
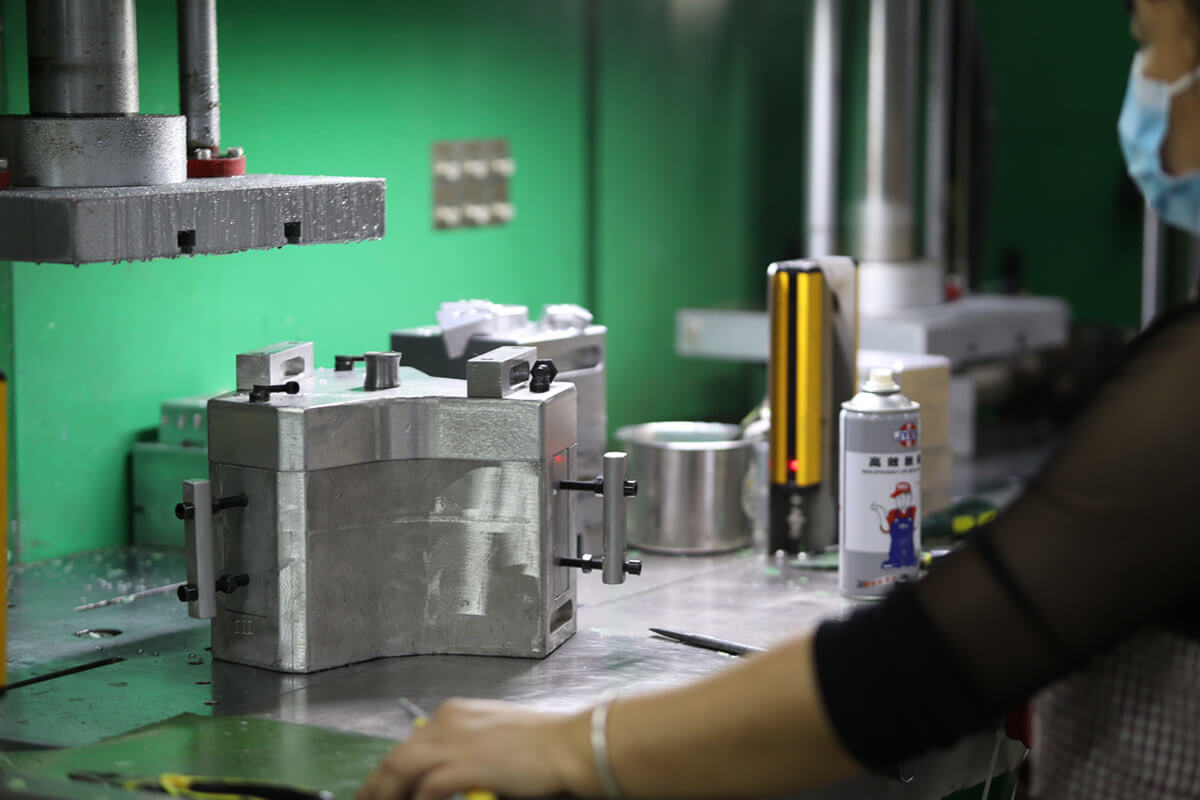
Today’s wax mold is the “fan” of ancient times. With the development of industry, now it is not necessary to use clay as a “mold”, but to use three-dimensional drawings to make complex molds (fans) through engraving, milling, cutting and other processing centers. In general, aluminum is selected as the mold material. Because of its good thermal conductivity, light weight, easy processing and so on. According to the complexity of the product and the quantity of mass production, there are two mold methods to choose from: manual mold and automatic mold.
Manual mold
This type of mold is manually closed and demoulded by workers. Due to the need to operate the buckle, fix, take out, place and other cumbersome procedures. It takes a relatively long time to make a wax mold. Therefore, it is suitable for products with small quantities and long delivery time requirements. Its advantages are also very prominent: the cost of mold manufacturing is comparatively low, and products with complex structures can be produced. Products with relatively larger dimensions can be manufactured.
Automated mold
In the wax mold manufacturing process, the automated mold completes the mold clamping and mold withdrawal actions automatically through machinery. Workers only need to take out the wax mold and clean the mold. And usually make multiple wax molds at a time. Therefore, the batch manufacturing speed is fast. For a relatively large number of products, the cost of manufacturing a single wax mold with automated molds is often lower and more efficient. But the automatic mold itself is more complicated to make. Components such as air pressure and connecting rods need to be used, and considering the need for fast and smooth automatic ejection, more time and cost are required for design and manufacture this kind of molds.
All in all, which mold to choose to make wax molds requires comprehensive consideration of product requirements and cost control. So we can complete the casting of our products in the most suitable way.
Making wax patterns is the second step of investment casting. Also called wax pressing or wax injection, it is the process of making wax molds through wax pressing machines and molds. The wax pressing machine injects was into the mold, and then takes out the wax pieces. The shape of the wax piece is the shape of the casting product after casting.
At first, we manually injected paraffin particles into the drop chamber under the wax pressing machine. However, this method is time-consuming and laborious, and it takes a long time to replenish wax. At the same time, the production cannot continue during replenishing wax. What’s more, the temperature drops due to the suspension of the wax pressing machine during replenishing wax, which will further lengthen the time to resume production. On the other hand, you will inevitably have a certain amount of impurities in the raw material of sodium granules, which will bring a great burden to the filter system for pressing garbage. Therefore, in order to solve these problems, we introduced an automatic wax injection system. A set of pre-treatment equipment for wax raw materials is set next to the wax injection workshop.
The equipment can not only melt the raw material of wax particles into wax water for filtration, but also deliver it to the wax pressing machine through pumps and pipes. It can also dewater, degrease, purify and filter the recovered wax and then deliver it to the wax press for wax mold production. We can see that many pipes wrapped with aluminum foil lead to the wax press. These pipelines are the transportation channels of wax raw materials. The outside is wrapped with thick thermal insulation material to avoid the blockage caused by wax solidification due to low temperature during transportation
The wax pressing machine
The wax pressing machine is the key equipment for producing investment casting wax patterns. There are many types of wax press machines, such as medium temperature wax mold press machine, low temperature wax mold press machine and fully pneumatic medium and low temperature wax mold press machine. The most used one is the medium temperature wax mold press machine. The medium temperature wax mold press machine generally consists of the following main parts:
Hydraulic system: it is the power source for wax feeding, mold clamping and wax pressing.
Wax storage system: It is generally composed of wax storage tanks, wax delivery pipes and wax pressure mechanisms to complete the storage, transportation and pressure injection of wax liquid.
Temperature control system: It is used to adjust the temperature of wax storage tank, wax conveying pipe and wax pressing machine within the range of room temperature – 100 ℃ to meet the production requirements.
Operating system: It is used to realize the lifting of the workbench, so that the wax inlet hole of the mold can closely fit with the wax pressing nozzle to prevent the leakage of high-pressure wax liquid. The wax raw materials are first filled into the wax storage tank at the lower part of the wax press. When the wax pressing machine is working, the wax conveying cylinder reciprocates, pumping wax liquid from the wax storage tank and pressing it into the wax pressing cylinder. When the wax conveying cylinder reciprocates several times, the wax pressing cylinder is filled. Before that, the mold closing cylinder closes the mold. After the mold is closed, the wax pressing cylinder presses wax to the mold. After the wax pressing is completed, the mold closing cylinder maintains the pressure for a certain period of time, and the mold closing cylinder returns to open the mold, take out the wax mold, and complete a work cycle.
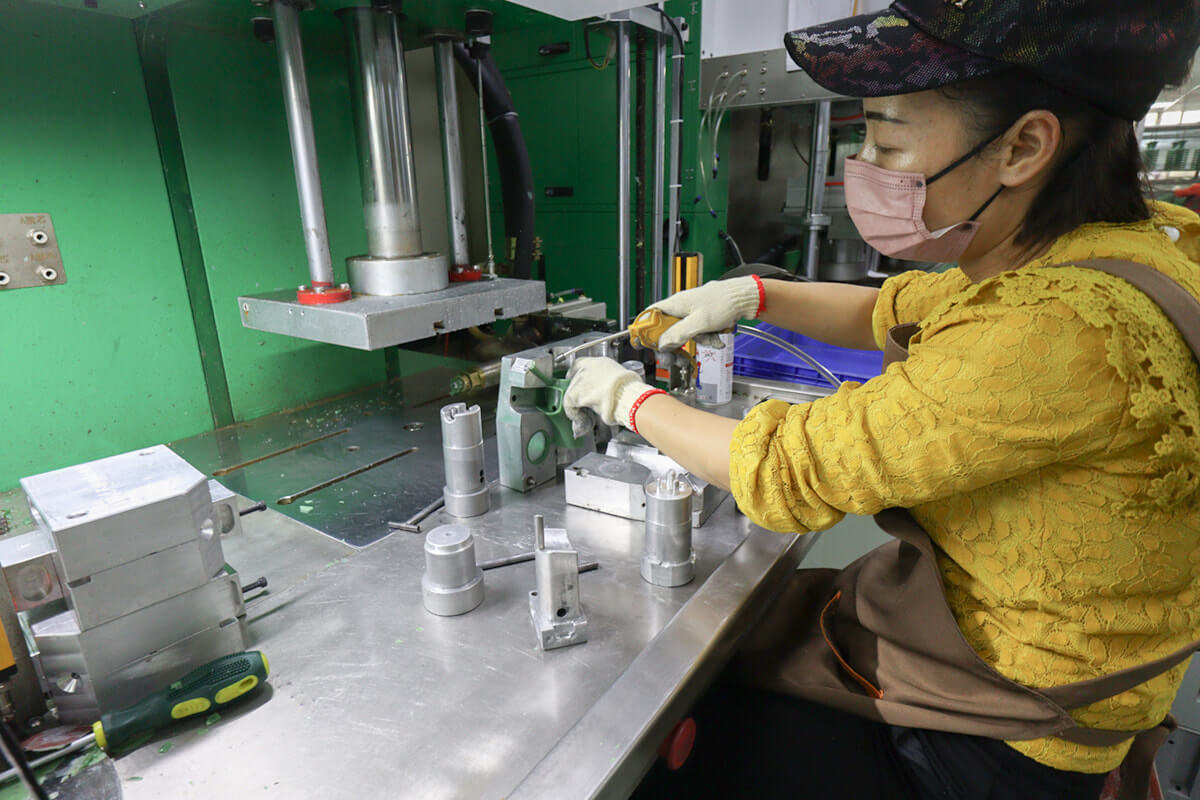
Making wax model patterns with manual mould
Generally, the wax injection machine for making wax models with manual molds is different from the wax injection machine for making wax models with automatic molds. However, the principle and procedure of wax injection are basically the same.
If you want to make wax patterns with manual molds, workers should first close the upper and lower parts of the molds, and then insert the locked bolts, pins, etc. in place. There are 4~6 simple mold bolts and pins, and for more complex molds, there can be up to a dozen bolts and pins. Workers need to spend more time locking. After the mold is assembled and locked, push it to the center of the wax injector workbench, and align the wax injection port of the mold with the nozzle of the wax injector. Then start the wax injection procedure and conduct wax mold injection production. At this time, the cooling table directly above the mold will press down to fix the mold, so that it will not move and play the role of cooling. The wax injection time varies with the size of the product and the number of cavities. In most cases, it takes more than 1.5 minutes for a set of wax molds to be made by manual molds. After the automatic wax injection is completed, the condensing table is retracted. Then the workers take out the mold, remove the fixed bolts, and remove the upper mold. First blow along the edge of the wax mold with an air pressure gun, and then carefully take out the wax mold. At this time, the wax model is still in a warm state and very fragile. Usually, a mold has multiple cavities, and the staff needs to remove the redundant parts connected after taking them out. Then place it in the nearby cold water tank to cool down to strengthen its strength.
Full automatic mold making wax patterns
Unlike the use of manual molds, workers do not need to engage in mold closing, locking, mold placement and other work in the process of fully automatic mold production. These procedures are completed through the linkage of wax injection machine and mold. Therefore, the time is greatly shortened and the efficiency is increased. Generally, the time required for making a cycle is about 30 seconds. Therefore, the proficiency of operators is also required to be higher. Workers also need to use air gun blowing and other methods to facilitate demoulding. Then separate the single wax pattern to remove the connecting part and put it into cold water for cooling.
Whether the manual mold or the automatic mold is applied, a little release agent should be sprayed on the mold to facilitate demoulding when pressing for 2 to 3 times.
In the process of wax pattern pressing production, workers are required to be dexterous and nimble. The rhythm of wax pressing production needs to be kept within a certain range. If the intermediate pause time is too long after a pressing, the subsequent pressing will cool too fast. It causes insufficient wax injection, incomplete wax mold and other problems. It needs to be suppressed several times before it can return to normal. If the operation is too fast and the cooling is not enough, the wax pattern will not form, collapse and other problems will be caused.
Even if the workers are skilled in operation, there will be many unqualified wax patterns in the pressing process and they will be scrapped. The scrap rate varies according to the different cavity of the product. But it is usually more than 20%. Scrapped wax patterns may be generated during wax injection, cooling, demoulding, separation, etc.
Cool them in cold water for more than 20 minutes, and then we can transfer them to the next process.
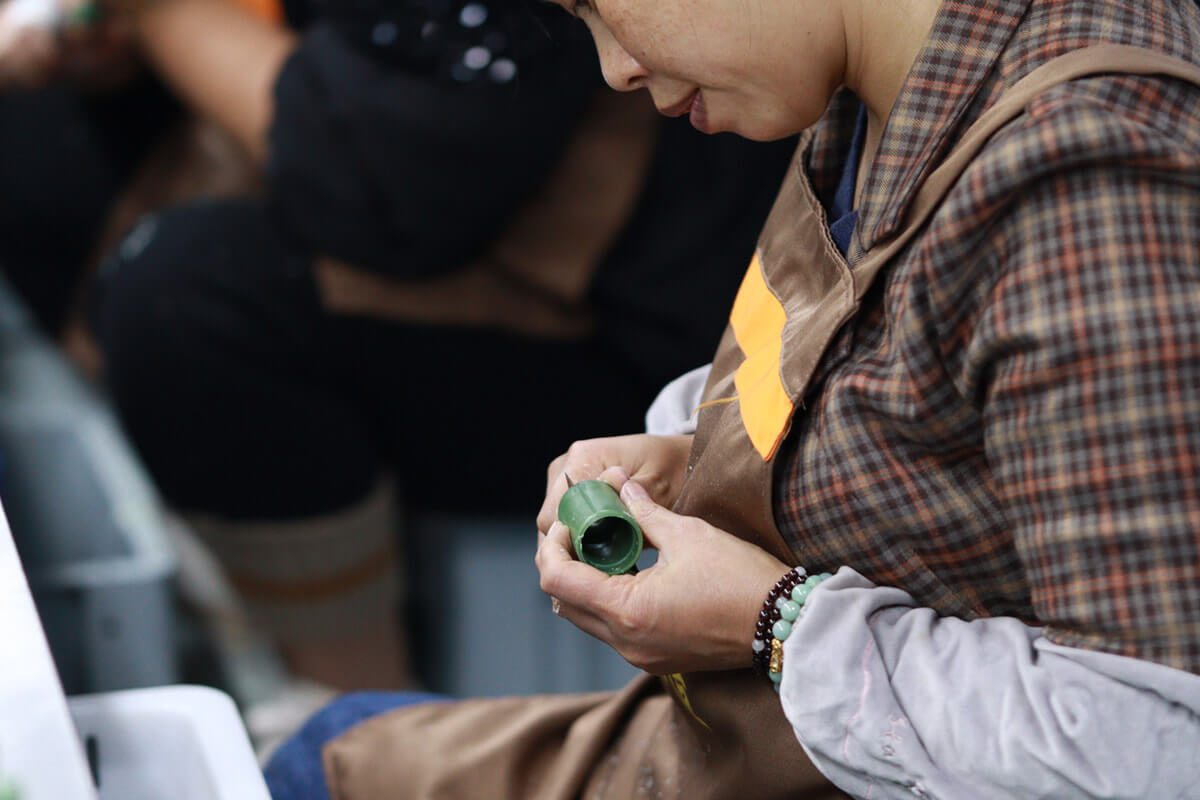
Cleaning and repairing wax patterns
Take the prepared wax patterns out of the water and dry it briefly before cleaning.
First, a worker will simply scrub the wax model to remove rough burrs, and then carefully select the damaged wax model. Then hand it over to the next worker for fine trimming. Carefully remove the flash and burr of wax patterns. Filling and repairing shall be carried out for the parts that are not full if conditions permit.
This step is also very critical. If the flash or burr is not cleaned up, the casting products will have prominent burrs or flash. If there are holes in the wax mold, the finished product will also have holes and sand holes. The details of the finishing requirements of the product are posted above the finishing workbench to prevent workers from missing or misoperating.
Therefore, this process requires workers to be very careful and take special time. Because wax pattern is very fragile, it is inevitable to produce loss during operation.
After careful trimming, the wax pattern is transferred to the wax patterns tree workshop. As the name suggests, tree formation is to form several wax patterns like a big tree. The wax pattern is a branch. Due to the different structure and shape of the product, the matching trunk also needs to be specially pressed. Therefore, making a product often requires two sets of wax mold. One set is used to produce wax patterns of products, and the other set is used to produce tree trunks for tree formation.
Why do they need to group trees? To complete the pouring, it is necessary to let the liquid metal flow into the mold cavity. In fact, the trunk of the tree is the flow channel for the liquid metal to enter the mold cavity. Therefore, it is as big and thick as a tree trunk relative to the wax pattern of the product. At the same time, no matter what kind of tree wax patterns, there are two small tree branches for ventilation at the bottom of the tree trunk, that is, on both sides of the casting port. A nut is embedded in the inner center of the bottom end to connect the hook.
The workers first put the tree trunk on the workbench, melted the connection head of the wax pattern with a flat head electric soldering iron, and then adhered to the tree trunk patterm, and then carefully checked and welded the connection. Avoid missing and faulty welding and ensure firm connection. After welding on one side, turn it over and continue to weld the wax mold on the other side. Until both sides are fully welded, like a big tree full of branches. It is worth noting that the worktable shall be cleaned before turning over. Use a high-pressure air gun to blow away residual wax chips before and after tree formation. Hand over to the next worker after welding. Workers use a hook with a round cover plate to connect it to the tree trunk pattern, and then hang it upside down on the drying rack. If there is no problem after inspection, push it into the shell making workshop for shell making.
For some special structural products, such as blind holes. The wax patterns cannot be produced at one time, otherwise the mold parts cannot be withdrawn. At this time, the wax pattern is generally divided into several modules for production based on the characteristics of wax. The welding and adhesion of these modules are also completed by the tree assembly workshop.
After wax patterns tree formation, the workers hang the assembled products on the drying rack, and wheels at the bottom of the drying rack can be directly pushed into the shell making workshop. Here, the workers first put the wax mold tree into clean water for cleaning, so as to remove the wax scraps that may remain during tree formation. Then it is placed in the zirconium slurry tank for slurry hanging. The slurry hanging operation needs to be gentle and careful to make the zirconium slurry adhere to the surface of the wax mold evenly. The fluidity of the pickaxe powder is good, and it has strong viscosity with glue. Zirconium powder can increase the strength of mold shell. The soaking process takes about 1 minute. Then put the product trees with mortar into the dry sand pool next to them for sand wrapping. For the first time, 200 mesh mullite sand was used. Hang it back to the drying rack after even sand coating.
After finishing the first layer of shell making, push it into the drying room for drying. The drying room is equipped with a constant temperature and humidity machine. There are fans on the front, side and top for 24 hours operation. Ensure the indoor humidity is about 28 ℃ and 60%. After 24 hours of drying, the process of slurry hanging, sand coating and drying shall be carried out again. The purpose of using extra fine sand for the first time is to make the mold cavity form a fine surface, which will bring good surface roughness. In order to improve the strength of the mold shell, the coarseness of the sand particles will be gradually increased later. From 200 meshes to 100 meshes, then to 30-60 meshes, and finally to 16-20 meshes. Generally, 6 layers of sand shells are wrapped around the wax model. If the product is relatively large and the mold cavity space is large, the thickness of the mold shell needs to be increased. Otherwise, failure to bear the pressure during pouring will cause shell explosion.
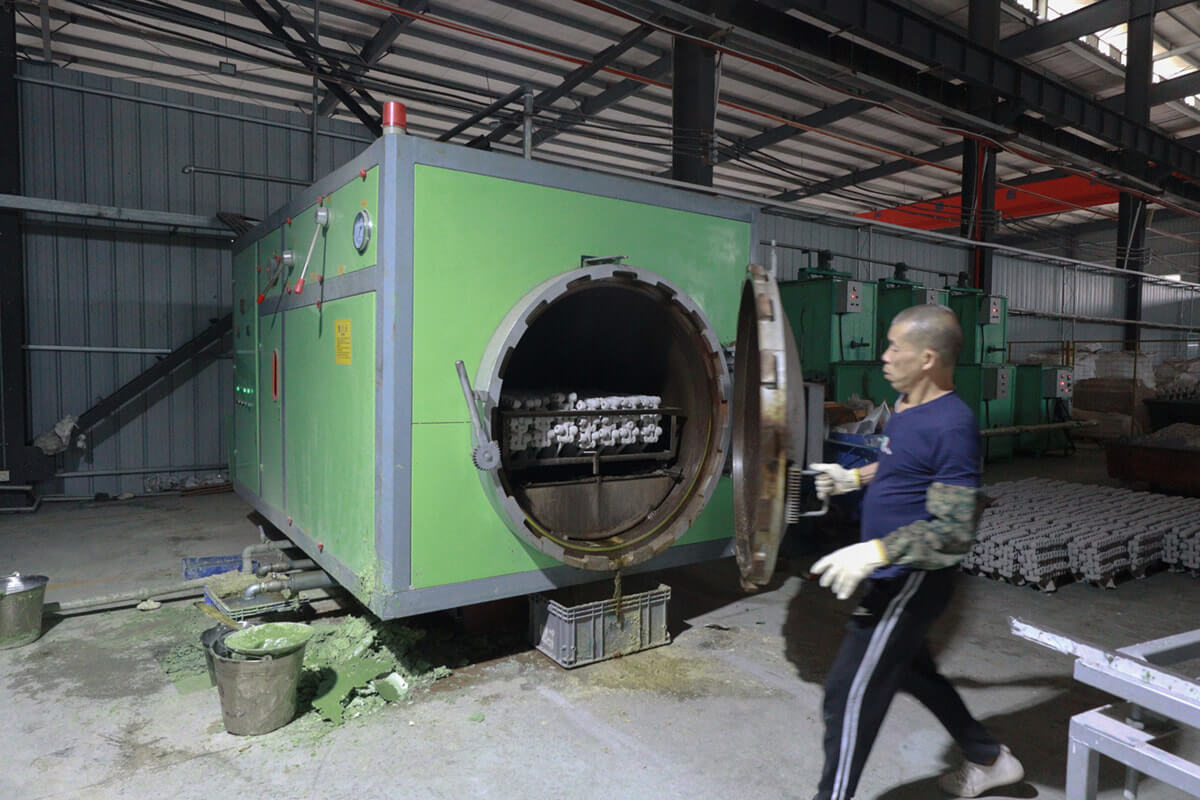
The worker took the sand mold from the drying rack, unscrewed the bolt hook, and placed it upside down on the special flat frame for wax removal. After one car is filled, push it into the wax removal workshop. There is a large heating wax removal machine dedicated for wax removal.
The flatbed truck can hold 30 sand molds at a time. Depending on the size of products, the flatbed truck can be separated up and down, and the upper part can be smoothly pushed into the wax removal chamber of the wax removal machine through the rail. The wax removal cabin looks like a return capsule for manned space flight.
After putting the sand shell mold tree containing wax patterns, close the air gate of the wax removal machine. Close the inlet valve and open the exhaust valve. After the switch is turned on, the machine will be heated and vented to raise the temperature in the cabin. Set the temperature to 175 ℃. Generally, it takes 8-10 minutes to reach the set temperature, then open the air inlet valve and drain the wax from the wax outlet below. The discharged wax will pass through the filter screen and then go into the wax recovery machine for dehydration and degreasing to realize recovery and reuse.
After about 15 minutes, wax removal is completed. The master opened the air lock door, and hooked the flatbed truck with a long iron hook to pull it out. The flatbed truck returns to the cart again along the track. Push the trolley into the cooling workshop for cooling.
When the wax patterns melts, the nut connecting the root of the wax patterns tree and the hook will fall on the flatbed truck. The worker will turn the sand shell upside down and then pick up the nut and send it to the wax patterns making workshop for new wax patterns.
The inner wall of the sand shell formed after wax removal is smooth and shiny when touched by hand due to the molten wax flowing out.
As the wax removal process requires moving and heating, the sand shell will also be damaged in this process. If the sand shell tree is not seriously damaged, for example, only one mold shell is damaged, it will usually be blocked before proceeding to the next step. However, if the damage is serious, the whole sand mold tree will be scrapped. Therefore, the workers are also required to be careful.
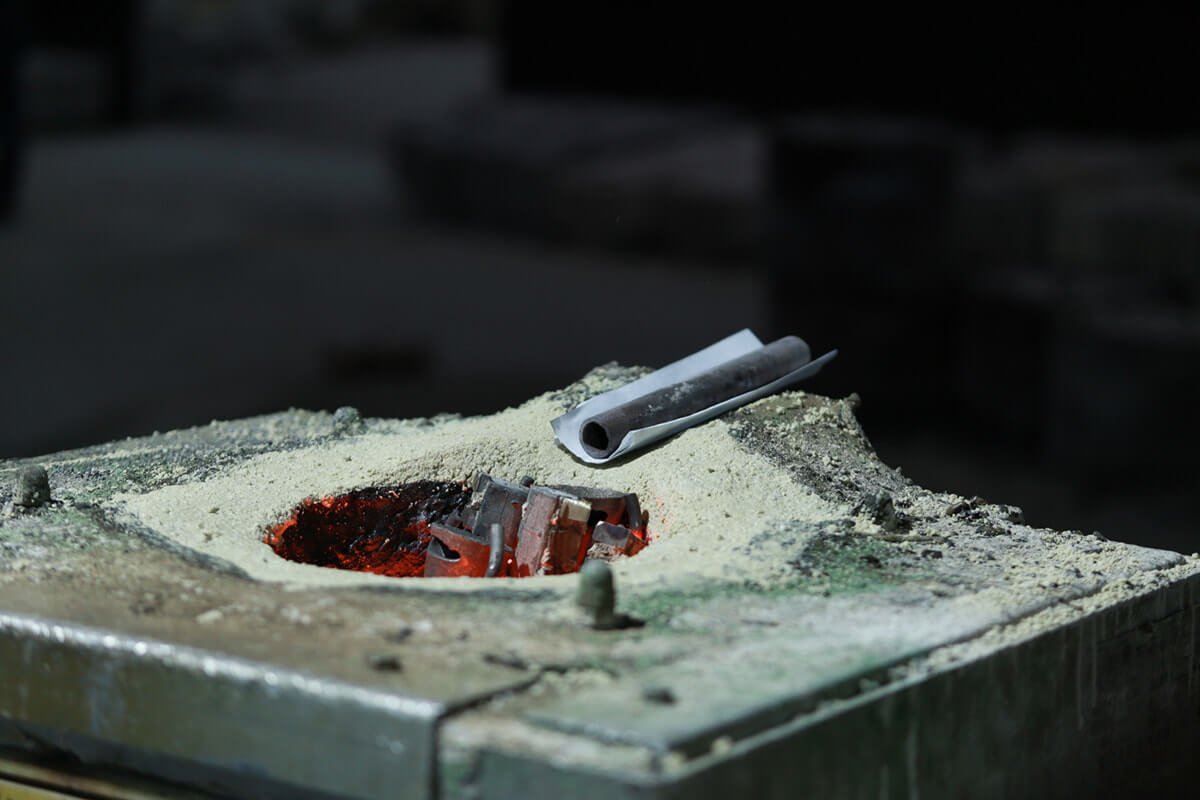
Potterization
When the sand shell mold tree, that is, “Fan”, passes the previous wax removal process, it will be left to cool and dry for more than 24 hours. The workers put the treated sand mold tree into the flatbed cart again and push it to the pottery workshop.
There are two purposes of pottery: first, the strength of sand shell will increase after pottery, so that the mold shell is not easy to crack when casting molten iron. Second, it is necessary to keep the temperature of the mold shell equal to the temperature of the liquid metal, so that the liquid metal will not touch the mold shell at low temperature and instantly cool down, resulting in insufficient liquidity, resulting in insufficient pouring, shrinkage, etc. Therefore, the pottery process is generally closely connected with casting.
The worker used an iron fork about 4.5 meters long in the shape of a harpoon to hold the sand mold and put it into the chamber of the pottery furnace. Because the sand mold needs to be sent into the heating furnace for 1~2m. And the temperature of the heating furnace is very high. In addition to wearing thick insulating gloves, workers usually pad a piece of insulating cotton and then hold the iron fork handle. When the temperature in the furnace chamber reaches more than 500 degrees Celsius, sometimes even thousands of degrees Celsius, it can be operated. Although the operation speed of the workers is very fast, it takes about 5 seconds for the sand mold to be put in place. Therefore, the temperature of the iron fork will rise very hot. Usually, a sand mold weighs 5~10kg. How can workers place the sand mold stably with such a heavy weight and such a long iron fork? If I don’t handle it carefully, the mold will fall down and break. So we put a shaft in front of the door of the heating furnace. Using the lever principle, the long iron fork is placed on the rotating shaft and fed into the mold shell in the furnace. Use this shaft when taking it out.
In addition to the high temperature, there may also be flames in the furnace cavity, and the red inner wall will cause visual problems to workers. Therefore, workers will wear goggles during operation. At the same time, in order to prevent flying flames, wear protective clothing.
Usually, two workers operate at the same time. Alternate placement. It is a great test for the strength of workers.
Close the gate after placing the sand mold. Set the heating to 1200 degrees Celsius. The mold shell must be fully heated and vitrified. At this moment, the process usually takes two to three hours. This is still under the condition of 24-hour heat preservation of the heating furnace. If the heating furnace is not kept at 500 ℃, the heating time will be greatly prolonged. Therefore, the heating furnace of the foundry will not be closed all the year round, even if there is no heating, it will also be in the heat preservation mode. It takes a lot of energy.
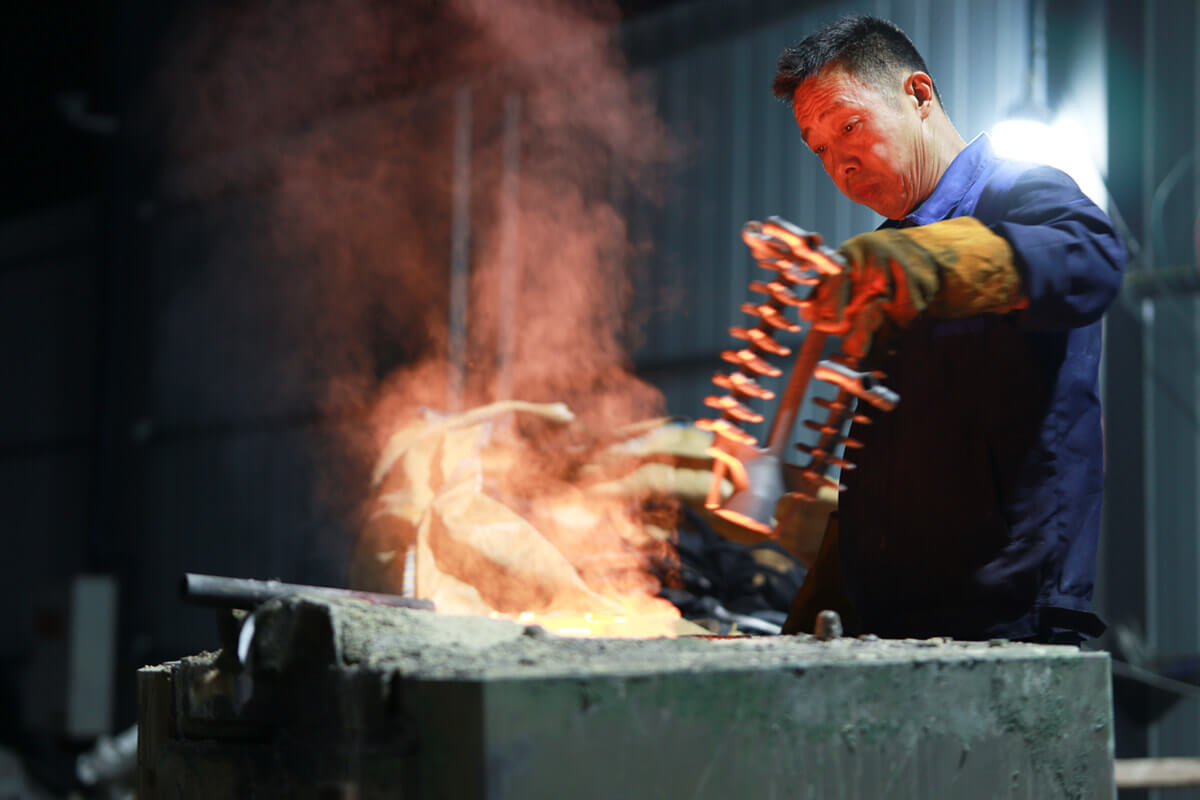
While baking and pottery the sand shell, experienced workers and masters also began to operate the furnace to melt the metal raw materials.
The first step is to clean the furnace. The furnace usually adopts electromagnetic heating and is not very large. The most common capacity is about 200kg. The height of the equipment is less than one person, and the thick furnace wall looks heavy. The furnace mouth will sink about 4cm steps in the inner circle. If it is the first pouring of a day, the furnace is in a cooling state, and the furnace mouth and furnace wall will need to be carefully cleaned. The worker master carefully cleaned up the residue with a chisel and hammer. After cleaning, blow it with a high-pressure air gun. After that, the steps where the furnace mouth sinks shall be filled with a concrete like cushion mixed with mullite and zirconium powder. A runner is made to facilitate the pouring of molten liquid metal.
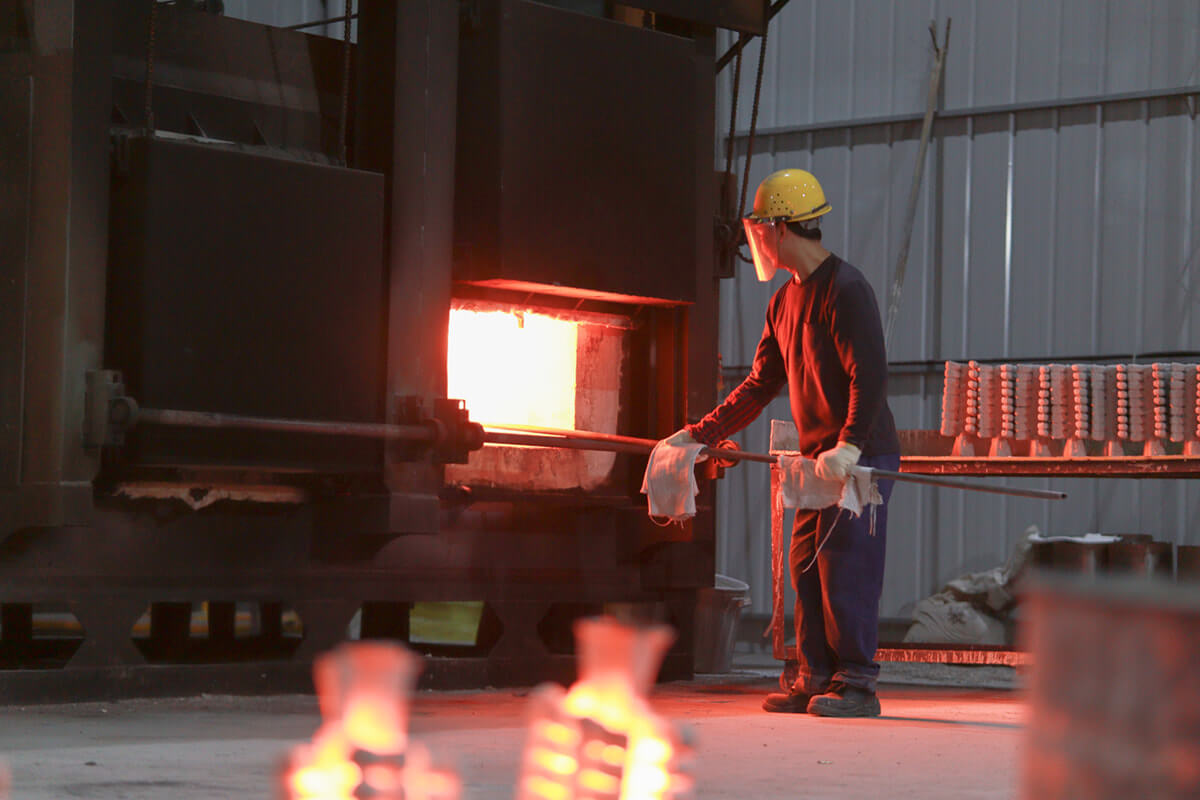
Workers will slowly heat some raw materials and slowly heat the furnace with low power. Don’t underestimate the slow low power heating. At this time, the power of the furnace is generally about 500 kilowatts. During this period, slowly add raw materials and increase the power of the heating furnace. It takes about one hour to reach high power after about 3500 kW operation. At this time, the raw materials put in will melt at the speed visible to the naked eye. After the liquid metal is completely melted, because the metal density is high and the impurity density is low, it can be seen that there are black impurities floating on the surface of the liquid metal. The master will use a big iron spoon to add a special sand like slag remover to the furnace to remove impurities. The slag remover will float above the liquid metal and absorb impurities. Then quickly turn over the iron bar and put it into the waste bucket beside. It can be seen that when the waste residue first came out, it was bright red with a little black, and then quickly turned into black purple. Depending on the impurities, the times of impurity removal are different, ranging from several times to more than ten or twenty times. The master worker first uses experience to judge, and then takes the sample to the laboratory to analyze the composition. If any element fails to meet the requirements, corresponding elements will be added to ensure that the material is qualified.
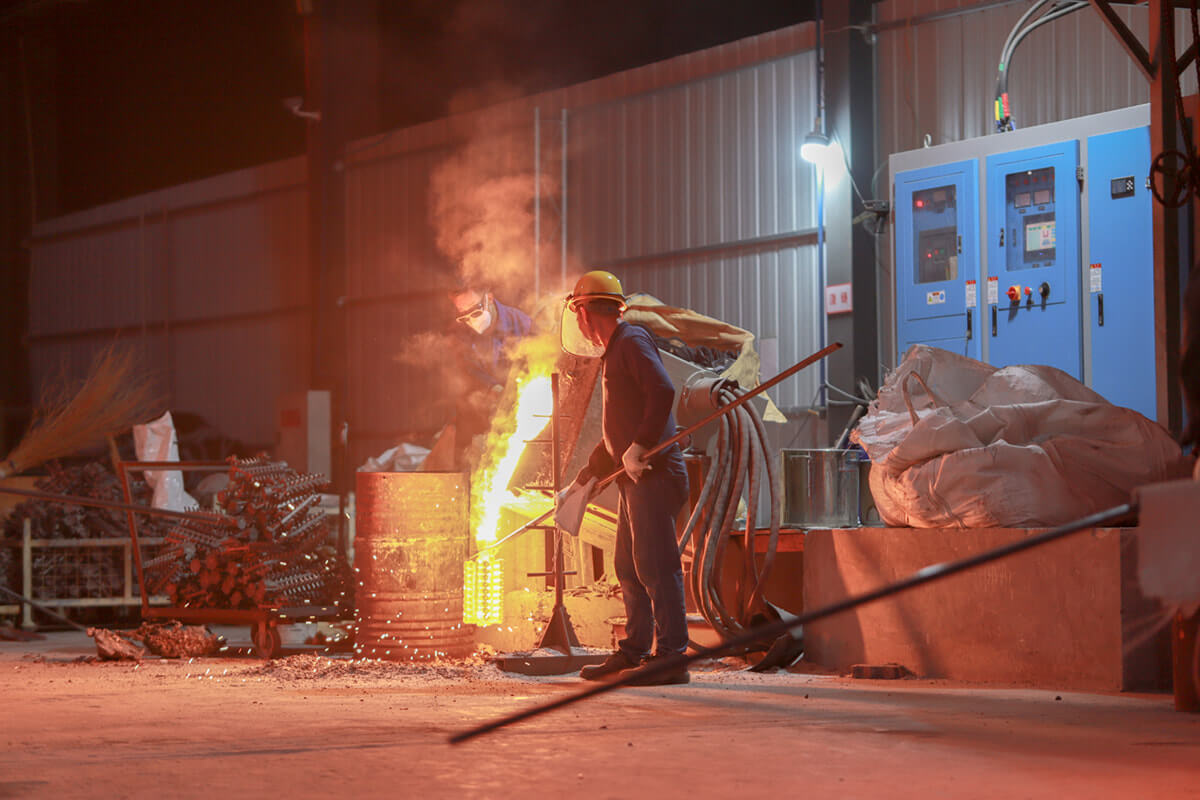
When the sand shell is fully baked, the molten liquid metal is also prepared accordingly. The workers should wear protective clothing, eye protection helmets, still wear thick thermal insulation gloves and thermal insulation cotton on their hands, open the heating furnace, and use the long iron fork that was previously fed into the mold to fork out the red mold from the furnace. Then quickly place it at the furnace guide port. The master who operates the furnace reverses the furnace so that liquid metal flows into the pouring port of the mold. After the mold is fully filled, the master operates the furnace to turn back. The workers holding the moulds put the bright red moulds on a platform paved with fine sand in advance. Then continue to take out the mold in the baking oven and repeat the operation. The scene is tense, grand, and fast-paced, which makes people feel excited. The mold shall be taken out, poured and placed within 10 seconds at a time.
The reason for such rapid completion is to prevent the mold from being taken out of the oven for too long and the temperature is too low, which will cause the temperature drop after the liquid metal flows in, leading to insufficient liquidity and too fast shrinkage. Therefore, casting porosity and other defects occur.
If the sand mold is not strong enough in some places, the mold will break in this process. Blood red liquid metal will leak. The master worker will quickly place the leaking mold on the specially prepared sand table nearby.
When a casting is completed, the workers will cover the slightly cooled casted products with a box shaped iron cover. The purpose of closing the cover is to make the product cool slowly rather than rapidly, which will cause defects due to rapid shrinkage. After more than 8 hours of cooling, the workers sent them to the next production workshop for shell removal.
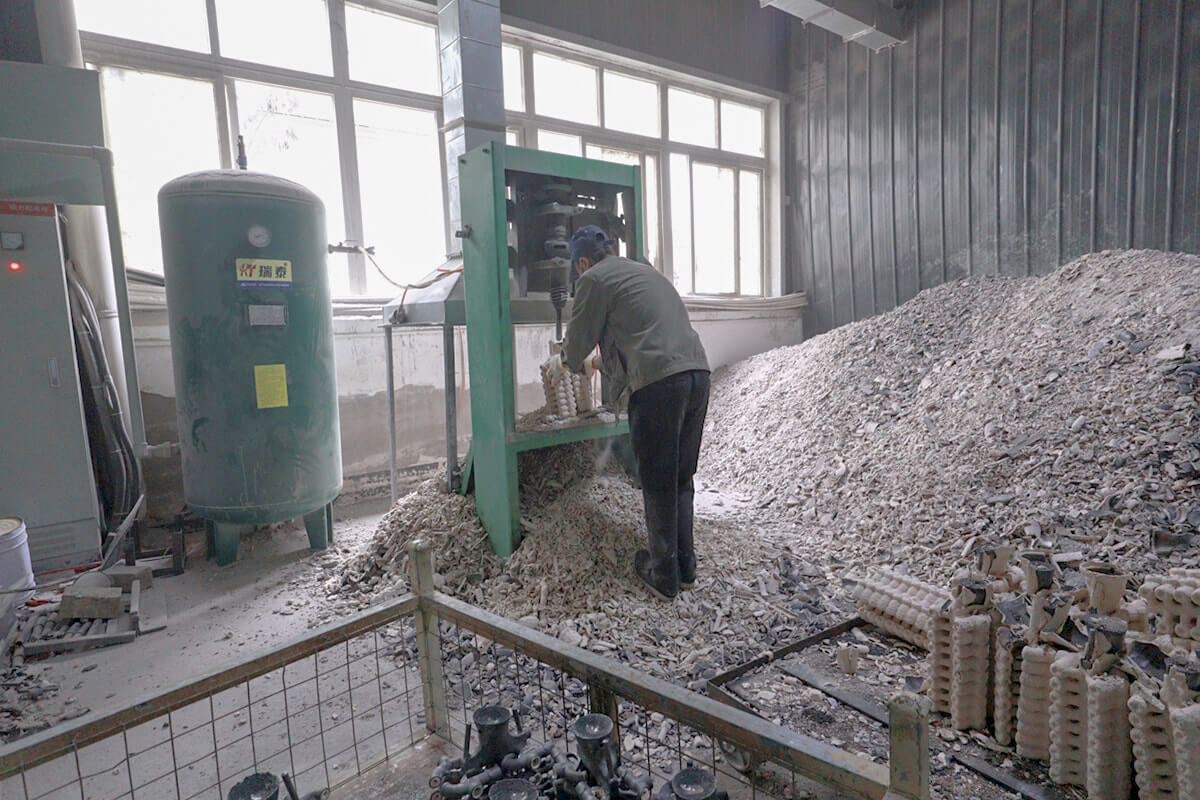
The fully cooled products after casting will be sent to the shelling workshop. In ancient times, when there was no professional machine, this process was completed by manual beating. However, such efficiency is low, labor cost is high, and it is time-consuming.
Nowadays, special vibration sheller is used for shelling. Put the product on the placement table, and the machine will be fixed first, and then start vibration. The sand shell is separated from the metal by high frequency vibration. But even with professional machinery and equipment, this is still a very tiring job. The workers shall move the product tree with mold shell by hand, and put them into the cart on the other side after removing the shell. At the same time, select some obviously unqualified ones and put them on the other side. The waste slag generated by shelling shall also be cleaned. The huge noise generated by high-frequency vibration and impact, as well as the large amount of dust generated by sand shell separation, will cause great harm to the health of workers. The workshop shall be equipped with corresponding dedusting equipment. Workers also need to wear masks and earmuffs for protection.
After removing the sand shell, the workers will transfer the tree shaped products to the next workshop to separate the products from the flow channel.
Casting products removal
You will find that every time you search the process flow of investment casting on the Internet, most of the procedures after casting are cleaned up, or the post-processing and that is all. Some write that shell shakeout is followed by inspection after cleaning and then warehousing. But the fact is far more than that.
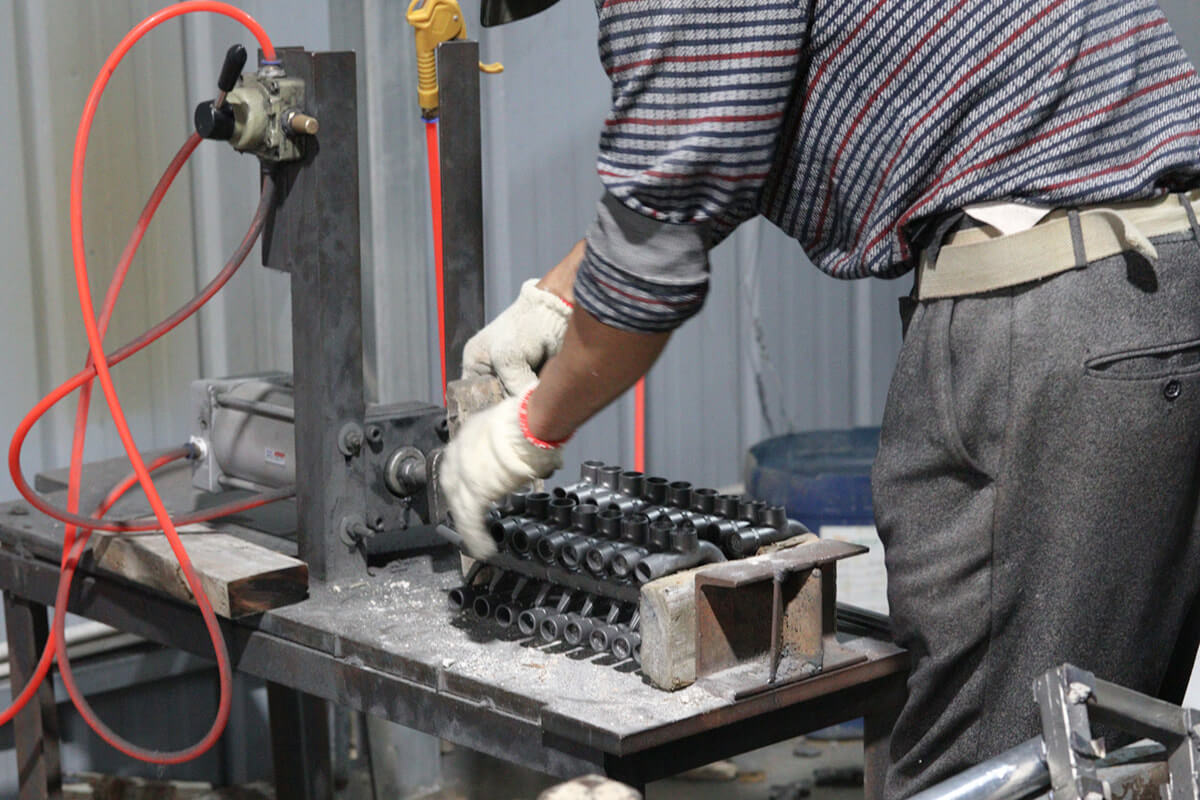
When the cast products come out of the shakeout workshop, the workers will transfer them into the separation workshop. In order to let the flowing liquid metal enter the product mold cavity smoothly, we must provide it with a forward passage, which is what we call the runner. Do you still remember the tree trunk (mold head) that needs to be made for tree formation when making wax molds? After wax removal, a runner is formed in the die head. Because the wax pattern and die head of the product are welded tightly during tree assembly. As required, there should be no gaps, otherwise the formation of the flow passage will be affected and the liquid metal will not flow into the product cavity normally. Therefore, after casting and cooling, the runner is a metal block just like the product and is closely connected with the product. It looks like a metal product tree. At this time, we need to separate the product from the metal runner. According to the shape and size of the product, the size of the product casting runner is different. The more complex the product is, the larger the runner is needed to make the liquid metal flow smoothly into the product cavity. At this time, the thicker the connection between the product and the central trunk, the more difficult it is to separate.
According to the thickness and direction of the connection, we will use different methods and equipment to separate products. For example, the gap between the product and the central trunk is relatively large, the metal flow channel is thick, and the connection is relatively firm. At this time, the cutting machine can be used for cutting. Place the product tree on the cutting machine workbench, and operate the cutting machine to separate the product from the die head after fixing. At this time, the scene can be compared to a beautiful fireworks, sparks splashed, and loud noise. And accompanied by the unpleasant smell of metal burning diffusion. The operator needs to be very careful to prevent injury. At the same time, it is also necessary to wear protective masks, helmets, ear protectors, etc. to protect the respiratory tract, vision and hearing.
If the product connection channel does not need to be too large, then we will make the connection smaller. In this way, the product tree can be fixed on a special fixed lathe, and then the workers use a specially designed crowbar to pry the product using the principle of lever and metal fatigue. Separate the product from the die head. It is relatively easy, but the labor operation cost is also high and the speed is slow.
When separating the products, the workers will put the qualified products into the basket specially filled with qualified products. The defective products produced after casting cooling do not need to be separated and put into the waste blue for recycling.
The separated finished product will retain the flash at the separation point, which is usually large. Some reach more than 5mm. Therefore, we will send them to the rough grinding workshop for polishing.
Rough grinding
When the product is separated from the die head (runner), large burrs and flash will remain at their joints. The workers sent them to the grinding workshop. There are grinding machines roaring here. The workers hold the products and grind and remove the product burrs one by one.
The grinder we use here is different from the ordinary fixed grinding wheel. Due to the large amount of grinding, the wear is quite serious. Therefore, replaceable sand belt is adopted. The sand belt is covered with high-strength grinding sand grains. Fix the grinding belt on the belt pulley to form the grinding wheel. When the grinding wheel rotates, the workers will slowly approach the bulge and flash formed by the cutting edge. Carefully grind off the bulges and fins.
During operation, workers can judge whether it is completely removed or excessively polished by visual inspection and experience. Therefore, the operation also needs to be bold and careful. Unqualified products or products with excessive grinding will be put into the waste box for scrapping.
The polished products will be sent to the shot blasting workshop for sand removal.
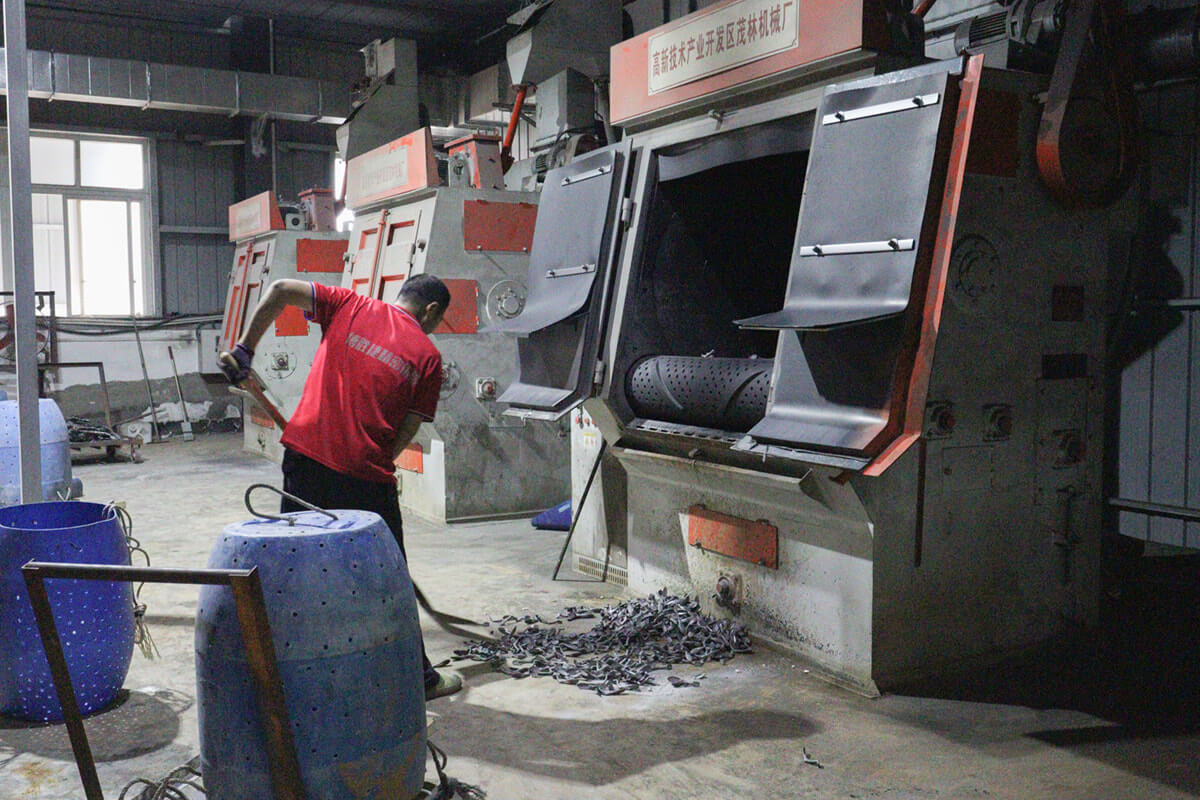
Sand removal
Remove the bulges and big flash burrs connected with the die head by workers’ first polishing. The products will be sent to the shot blasting workshop. The product just cast is black gray. Every nook and cranny is covered with residual mold sand. Especially for products with inner holes or blind holes. It can not be removed cleanly by vibration or manual shelling.
Shot blasting machine is used to remove sand and oxide skin on the surface of cast steel and iron castings in the casting industry.
Almost all steel castings, grey castings, malleable iron castings and ductile iron castings shall be shot blasted. This is not only to remove the oxide skin and sand on the casting surface, but also an indispensable preparation process before the casting quality inspection. In general casting production, shot blasting is an indispensable process to find surface defects of castings, such as subcutaneous blowholes, slag holes, sand sticking, cold shut, peeling, etc. The shot blasting machine used for precision casting products is generally drum type and chain plate type. Drum type and chain plate type shot blasting machines are suitable for cleaning small and medium-sized castings that are not afraid of collision. The drum type shot blasting machine makes the casting overturn and move forward by relying on the spiral guide bars in the barrel. The chain plate shot blasting machine makes the casting overturn and run through the movement of the chain plate. Rotary table, trolley type and hanging type shot blasting machines are used to clean large and medium-sized castings. Usually, they are equipped with fixed shot blasting chambers in which the cleaned castings rotate or move. The shot blasting room is generally equipped with several shot blasting machines, which are installed at different positions and shot from different directions to improve the cleaning efficiency and quality of the shot blasting machine. The hanging shot blasting machine can be equipped with several hooks on the catenary according to the needs of the castings to be cleaned. During cleaning, the castings are hung on the hooks and turn over automatically while moving forward. Castings shall be loaded and unloaded outside the shot blasting room and cleaned indoors.
The shot blasting machine is mainly composed of four parts:
The shot blasting machine generally uses high-speed rotating impeller to shoot the shot in a certain direction under the action of high centrifugal force. During operation, some shot blasting machines can swing at a certain angle or move up and down.
Pill collection, separation and transportation system.
The bearing body that makes the casting continuously run and overturn during shot blasting cleaning.
Dust removal system.
Shot blasting process can not only remove large area of bonded sand, but also remove the burrs of castings. At the same time, defective products can be found after removing the oxide skin on the casting surface. The shot blasting time varies according to the product. But it is impossible to remove the stubborn sticky sand by shot blasting alone. Moreover, shot blasting shall not be carried out for unlimited times and time. Because excessive shot blasting will damage the product itself.
A second program needs to be introduced. After a shot blasting, put the product into a plastic bucket. Transfer the product into the pickling workshop. The pickling workshop must be equipped with a full set of sewage treatment system. This sewage treatment system occupies more than half of the whole workshop. The plastic buckets filled with products are filled with water holes, and these buckets are put into the pool where the pickling solution is prepared. The acid will flow into the barrel through the small hole to soak the casting. After a certain period of time, lift out the plastic bucket, drain it, and then put it into the clear water tank for clear drainage. After being drained again, the workers will transport them to the shot blasting workshop again for shot blasting and sand removal. Repeat until the sand is completely removed. Determined by visual inspection.
For those products that are difficult to remove, we also need to remove them manually. High pressure sand blasting equipment is required. Finally, completely clean the casting. The cleaned product looks smooth and clean. However, there are still some surface burrs in corners that cannot be removed by large area shot blasting. Therefore, the products need to be sent to the fine grinding workshop.
Reshaping
Reshaping is not required for all precision casting products. For some products with high tolerance requirements, especially annular products, high coaxiality is required. Because the casting process will produce metal cooling deformation, grinding, shot blasting may also produce small deformation. Therefore, after shot blasting and sand removal, such products need to be reshaped.
As with other process products such as powder metallurgy products, shaping requires a shaping mold. Then put the mold on the shaping press, and put the product into the shaping press. Make the deformed products become regular through the mold. Plastic surgery requires manual operation, placing products one by one. Therefore, the process requires a lot of time and labor costs.
The products that need to be reshaped will flow into the fine grinding workshop for fine grinding after reshaping.
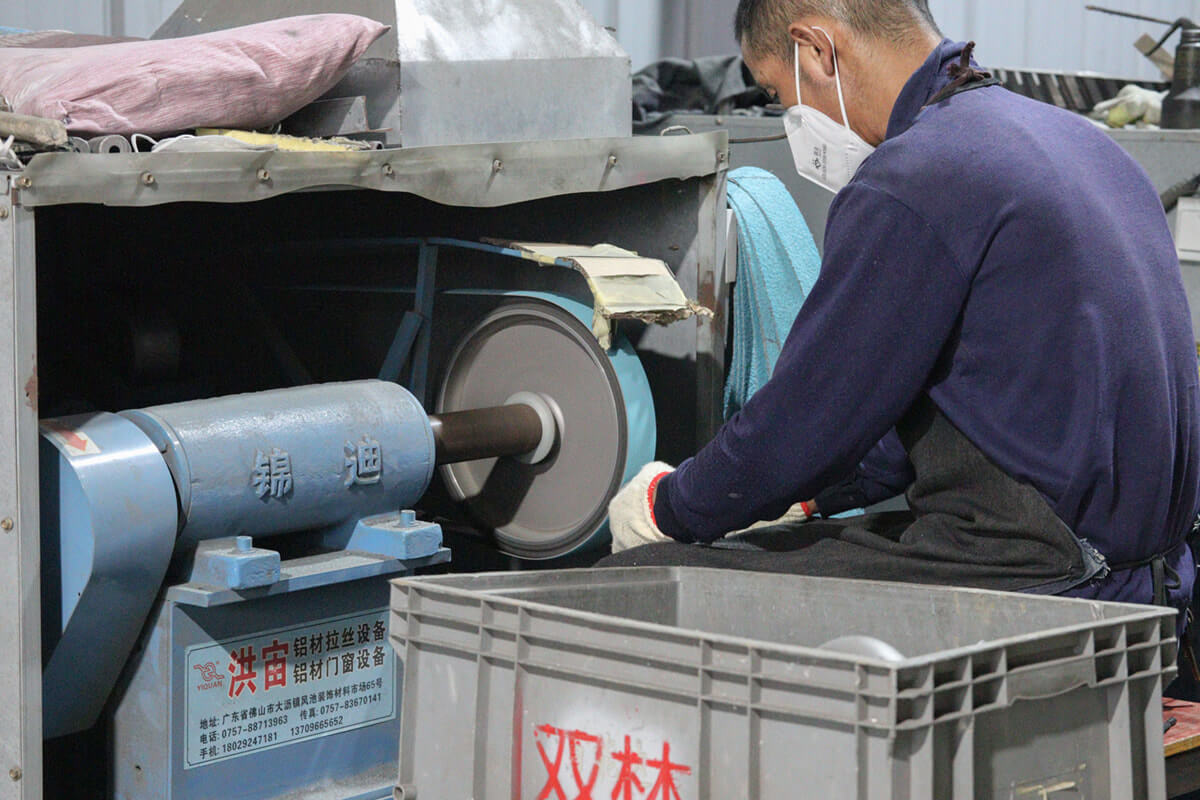
Fine Grinding
After rough grinding, pickling and shot blasting, the product surface has been very smooth. However, a large area of shot blasting cannot remove burrs and fins in some corners. In addition, product damage may occur in previous processes. Therefore, it is necessary to transfer the products to the fine grinding workshop.
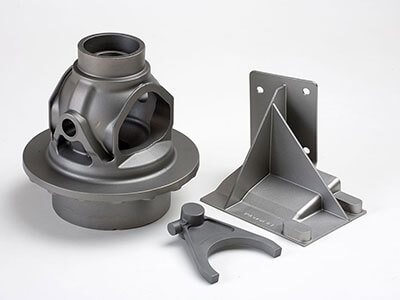
Here, the workers will use a small hand grinder to smooth the fine burrs on the product surface, and further remove the traces of the die head connection. In addition, the workers in this workshop are also responsible for selecting defective products. The surface of precision casting products polished by hand grinder is as smooth as a mirror, shining bright and very beautiful. This is also the last link of the product. After careful polishing, the products will enter the quality inspection and packaging workshop for final inspection and packaging.


 Making a mold to make wax molds is the first step in lost wax casting.
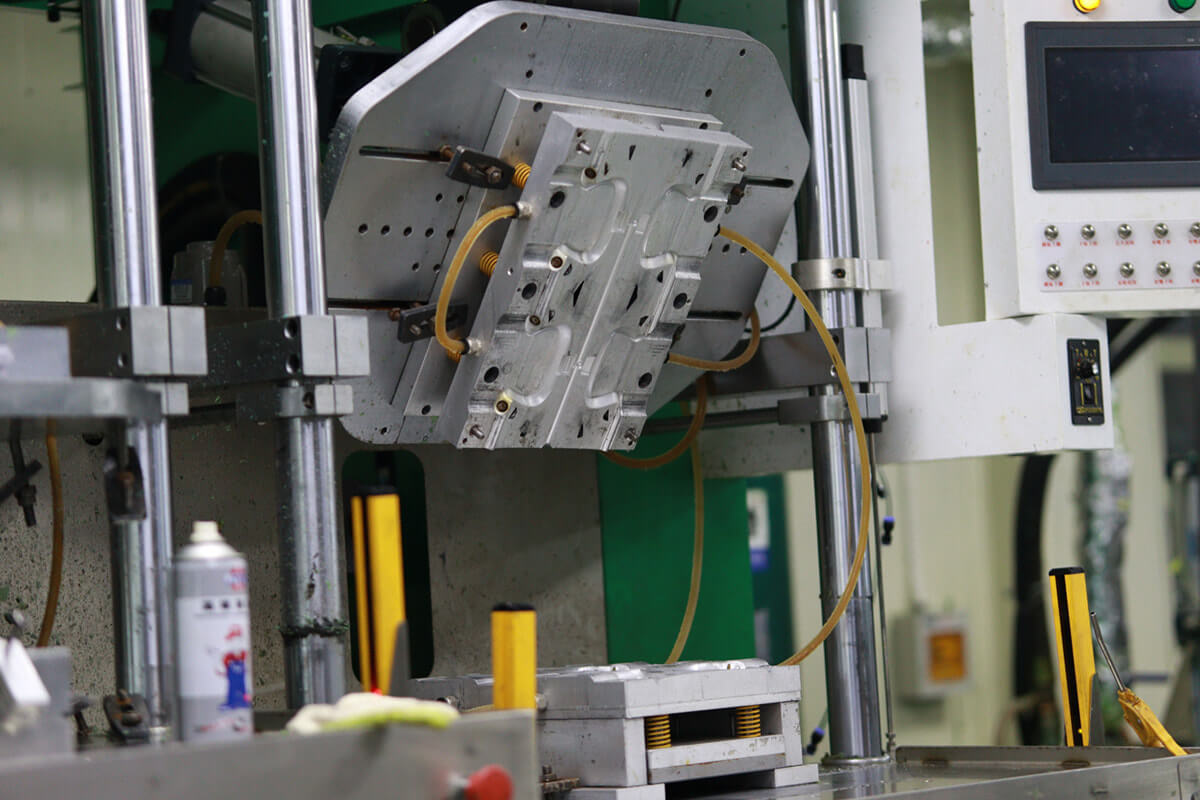
 After careful trimming, the wax pattern is transferred to the wax patterns tree workshop. As the name suggests, tree formation is to form several wax patterns like a big tree. The wax pattern is a branch. Due to the different structure and shape of the product, the matching trunk also needs to be specially pressed. Therefore, making a product often requires two sets of wax mold. One set is used to produce wax patterns of products, and the other set is used to produce tree trunks for tree formation.
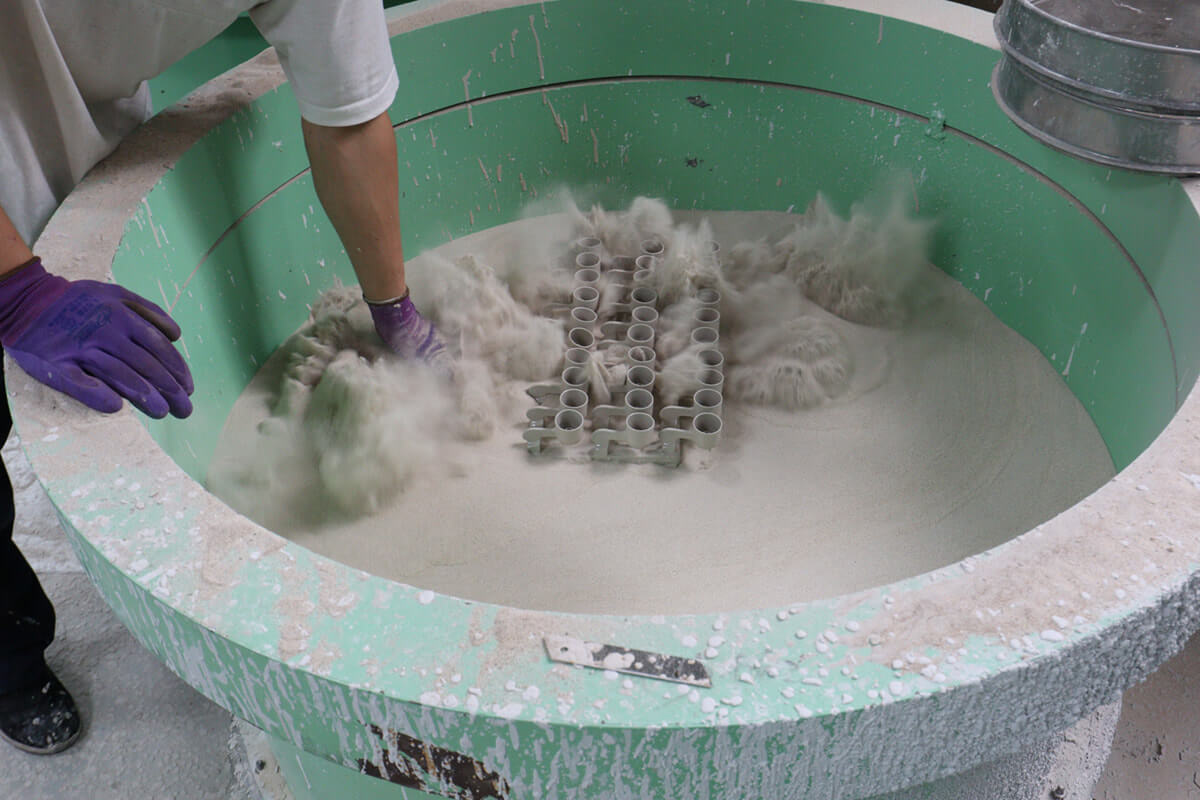
 While baking and pottery the sand shell, experienced workers and masters also began to operate the furnace to melt the metal raw materials.